OpenWrt IPv6 Tunnel Configuration (for Bell Fiber Internet)
The is an account of my experience getting an IPv6 tunnel working over my Bell Canada fiber residential internet service. It was a headache, so I thought I would document it. If you have Bell fiber residential internet service, and you have Bell’s mandatory “GigaHub” router, and you want IPv6 connectivity, then this is an exact recipe. However it’s mostly generic, and is still applicable if you have a different ISP.
Bell Canada’s residential fiber internet service doesn’t support IPv6. An IPv6-over-IPv4 tunnel is a solution, and Hurricane Electric provide a free IPv6 over IPv4 tunnel service. Should be simple, right?
Not so simple
Should be simple, but all my initial attempts failed and left me frustrated. The tunnel would send data but no data was ever received, and it behaved the same regardless of what platform I tested with. Even pinging my router’s public IPv4 address proved unreliable, and I needed that to work reliably to setup the tunnel. Others reported similar problems, and have been similarly frustrated by this.
IPv6-over-IPv4 is implemented using IP protocol 41. A call to Bell’s tech support confirmed that they don’t block IP protocol 41 on their network, indeed they said they don’t block anything. In theory, then, it should work. And, in theory at least, if their network isn’t blocking anything then what must be blocking the tunnel traffic is the Bell Home Hub 4000 router, a.k.a. the “GigaHub”, that Bell provides to their fiber customers.
So how to get the IPv6 tunnel traffic through the Gigahub? It has DMZ support, even an “Advanced DMZ” mode that claims to completely bypass the router’s firewall. None of that helped. Indeed, it seemed even more unreliable and frustrating. There are many reports of GigaHub DMZ acting buggy, and that was my experience.
The solution
What I found does work to pass IPv6 tunnel traffic through the GigaHub router is PPPoE passthrough.
The solution I settled on was a dedicated OpenWrt router that configures a PPPoE connection to transit the IPv4 traffic (the only traffic that Bell supports), and a Hurricane Electric IPv6 tunnel, also running on the OpenWrt router, to support the IPv6 traffic. Clients of this router get both IPv4 and IPv6 internet access.
The PPPoE connection gets a new public IP address, different from the GigaHub’s own public IP address. This new public address is pingable, and IPv6 Hurricane Electric tunnel traffic passes through the GigaHub without problem.
Note, this additional, dedicated, IPv6 router doesn’t prevent the rest of the users on my home network (who don’t care about IPv6 connectivity) from routing their normal IPv4 traffic directly through the GigaHub.
Get your hands on an OpenWrt router
For those who have never used OpenWrt: You need a router that is supported by OpenWrt, and of course you need to install the latest version OpenWrt on that router. I used OpenWrt version 22.03.5, which was the current stable release at the time.
Any old router will work as long as it’s supported by the latest version of OpenWrt. I happened to use an old NetGear WNDR3700 that I had lying around unused. Old used routers are really cheap if you need one. Just be sure to check that it’s supported by OpenWrt. Try to avoid one that requires a serial console to perform the install if you don’t have much experience with such things, and wish to avoid added frustration.
OpenWrt router configuration
The configuration steps below are all performed using the OpenWrt router’s command line interface and assume that you’re are starting with a fresh install. You have to ssh into the router to get to the command line interface.
Connect your client computer directly to the router’s ethernet LAN interface and configure your client computer’s ethernet interface to use DHCP. The router will provide DHCP configuration to your computer, and you should then be able access the router using:
ssh root@openwrt.lan
All the steps below can be performed using the router’s LuCi web interface as well, but that’s not documented here.
Configure the wan (IPv4) network interface
The router’s ethernet WAN port should be connected to the same network as the PPPoE server (i.e. the Bell GigaHub).
Starting from a fresh install, log into your router using ssh and run the following configuration commands on your router to get an internet connection.
You need the same username and password that your Bell GigaHub uses to connect to Bell’s network. You can find the username on your GigaHub’s web interface, but not the password. If you don’t have the password then you’ll have to contact Bell or create a new one at mybell.bell.ca.
uci set network.wan.proto=pppoe
uci set network.wan.username="your-isp-username"
uci set network.wan.password="your-isp-password"
uci commit network
ifup wan
Wait a few seconds for the wan interface to come up and then verify that you have an internet connection.
Get your WAN IPv4 address from an external service:
$ wget -4qO- api.ipify.org; echo
123.456.789.123
Get your WAN IPv4 address from OpenWrt’s network status:
$ ifstatus wan |  jsonfilter -e '@["ipv4-address"][0].address'
123.456.789.123
The two should match. If they don’t, or if one doesn’t work, then something is wrong.
You’ll need this public IPv4 address later to create the Hurricane Electric IPv6 tunnel.
Install the tunnel software
Install the OpenWRT IPv6 tunnel software, and reboot the router.
opkg update
opkg install 6in4
reboot
Create the Hurricane Electric IPv6 tunnel.
Visit tunnelbroker.net and create a new IPv6 tunnel. You’ll need your router’s public IPv4 address (the WAN address from above) to setup the new tunnel.
After it’s setup, you’ll need the need the Hurricane Electric tunnel information below to configure the OpenWrt IPv6 wan6 interface.
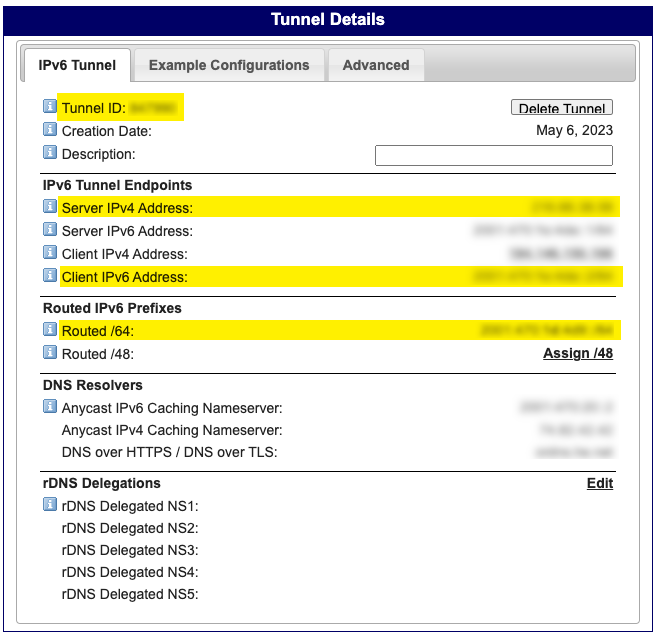
Configure the wan6 (IPv6) network interface
Finally, configure the IPv6 wan6 interface. Substitute the “henet-….” place holders below using the matching values from the Hurricane Electric “Tunnel Details” page shown above.
uci -q delete network.wan6
uci set network.wan6="interface"
uci set network.wan6.proto="6in4"
uci set network.wan6.peeraddr="henet-endpoint-server-ipv4-address" # you provide
uci set network.wan6.ip6addr="henet-endpoint-client-ipv6-addr" # you provide
uci set network.wan6.mtu="1480"
uci set network.wan6.tunnelid="henet-tunnelid" # you provide
uci set network.wan6.username="henet-username" # you provide
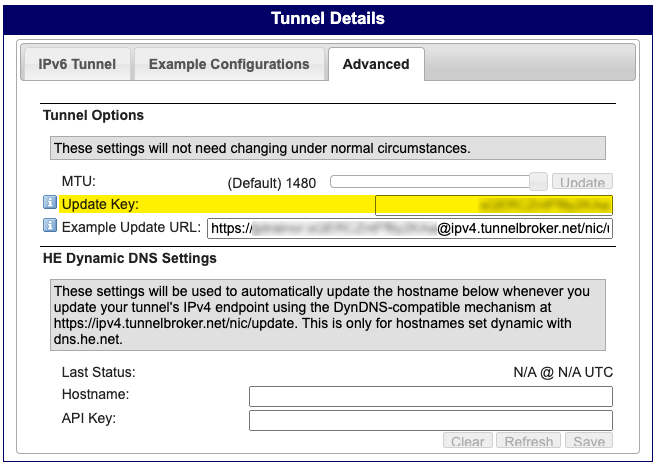
uci set network.wan6.password="henet-update-key" # you provide
uci add_list network.wan6.ip6prefix="henet-routed-prefix-64" # you provide
uci commit network
ifup wan6
Check IPv6 Connectivity
You should now have IPv6 connectivity via the tunnel.
Check on the router first.
$ ping6 ipv6.google.com
PING ipv6.google.com (2607:f8b0:400b:803::200e): 56 data bytes
64 bytes from 2607:f8b0:400b:803::200e: seq=0 ttl=121 time=11.088 ms
The router should be serving correctly configured IPv6 configuration to DHCPv6 LAN clients. The example below is the enthernet interface configuration of a Mac that is connected to the router’s LAN interface.
Expect to see multiple inet6 addresses. At least one of them should
begin with the “henet-routed-prefix-64” value that you provided
above. For example, If the IPv6 routed/64 prefix value is
2012:345:67:891/64 then you would expect to see something similar to
the following network configuration on the client ethernet interface:
$ ifconfig en0
en0: flags=8863<UP,BROADCAST,SMART,RUNNING,SIMPLEX,MULTICAST> mtu 1500
	options=27<RXCSUM,TXCSUM,VLAN_MTU,TSO4>
	ether 00:23:32:d4:72:80
	inet6 fe80::223:32ff:fed4:7280%en0 prefixlen 64 scopeid 0x4
	inet 192.168.1.111 netmask 0xffffff00 broadcast 192.168.1.255
*	inet6 2012:345:67:891:223:32ff:fed4:7280 prefixlen 64 autoconf
*	inet6 2012:345:67:891/64:b104:1994:896:aa46 prefixlen 64 autoconf temporary
	inet6 fd65:972f:1bf2::223:32ff:fed4:7280 prefixlen 64 autoconf
	inet6 fd65:972f:1bf2::19d6:5448:c14b:e14 prefixlen 64 autoconf temporary
*	inet6 2012:345:67:891/64::fdc prefixlen 64 dynamic
	nd6 options=1<PERFORMNUD>
	media: autoselect (1000baseT <full-duplex,flow-control>)
	status: active

* - this is the IPv6 tunnel prefix provided by the router via DHCPv6
The client should have IPv6 connectivity. This is what I see on my Mac:
$ ping6 ipv6.google.com
PING6(56=40+8+8 bytes) 1234:567:8a:9b1:b104:1994:896:aa46 --> 2607:f8b0:400b:803::200e
16 bytes from 2607:f8b0:400b:803::200e, icmp_seq=1 hlim=120 time=9.889 ms
If this much works, then every client that connects to the router should, in theory, have IPv6 internet access. Including wireless clients, if you enable wifi on the router.
WAN IPv4 Address Update
If the WAN’s IPv4 public address changes (which it will regularly on Bell’s network) then the Hurricane Electric tunnel must be updated. The OpenWrt 6in4 tunnel interface should take care of this automatically. If it doesn’t succesfully update your IPv4 endpoint address at tunnelbroker.net, then you will lose IPv6 connectivity.
Note that I have experienced occassions when it didn’t update correctly (for reasons that I do not yet understand). However, usually it does update correctly.
Debug this by logging into tunnelbroker.net and checking the “Client IPv4 Address” (see the Tunnel Details image above). Compare it to the OpenWrt router’s WAN interface IPv4 address. They should be identical.
You can also check the router logs to see if the update happened as expected:
$ logread | grep 6in4-wan6
Tue May 16 16:50:49 2023 user.notice 6in4-wan6: update 1/3: nochg 123.456.789.123
Tue May 16 16:50:49 2023 user.notice 6in4-wan6: updated
If the update failed, it will be obvious from the log messages. If there are no 6in4-wan6 log messages then the log messages from the last update may have been lost do to the limited size of the log file and you should consider the update status to be unknown.
If you need to force a tunnelbroker.net Client IPv4 Address update then try restarting the IPv4 wan interface (“wan”, not “wan6”), or execute an http GET on the “ExampleUpdate URL” seen in the Tunnel Details image above. You can execute this on the router command line as follows:
$ wget -4qO- https://henet-username:henet-update-key@ipv4.tunnelbroker.net/nic/update?hostname=henet-tunnelid
nochg 123.456.789.123
If the reply is “nochg …” then the tunnel’s Client IPv4 Address was up to date. If it wasn’t up to date, and was updated, then the wget reply will reflect that.
Here is a small script that you can leave on the tunnel router to make that easier, should it be necessary to force an update:
# /bin/sh

HENET_TUNNEL_ID="$(uci get network.wan6.tunnelid)"
HENET_USERNAME="$(uci get network.wan6.username)"
HENET_UPDATE_KEY="$(uci get network.wan6.password)"

wget -4qO- https://${HENET_USERNAME}:${HENET_UPDATE_KEY}@ipv4.tunnelbroker.net/nic/update?hostname=${HENET_TUNNEL_ID}
Addendum
Read my follow up post regarding how I integrated this into my home network.