IPv6 Tunnel Local Network Configuration
This is a followup to my post about configuring a Hurricane Electric IPv6 tunnel on an OpenWrt tunnel router in order to work around lack of IPv6 support by Bell. It describes how I integrated a tunnel router into my local home network.
There are three important constraints that determine how and why I did this the way I did it:
-
Hurricane Electric’s tunnel service is, in their words: “… oriented towards developers and experimenters that want a stable tunnel platform.” And that is what I’m using it for - development. I don’t use it full time. I connect to it as needed when I specifically want to test something that requires IPv6.
-
My internet service is fast 1.5 Gbps fiber. I don’t want, or need, routine network traffic transiting the IPv6 tunnel needlessly. It would just get in the way and slow down everything with no advantage. The tunnel should be totally out of the loop for the rest of the ordinary users of my home network, and for most of my regular work. There’s no advantage to exposing IPv6 to the entire network as long as Bell continues to not support IPv6 natively.
-
I have no interest in getting a new (expensive) primary router to take over all the routing on my network. Most of the traffic has to be routed normally by the Bell GigaHub. The IPv6 Tunnel Router, for its part, won’t handle a lot of traffic and doesn’t have to be fast to meet my needs.
With that in mind, here, unsurprisingly, is the network topology:
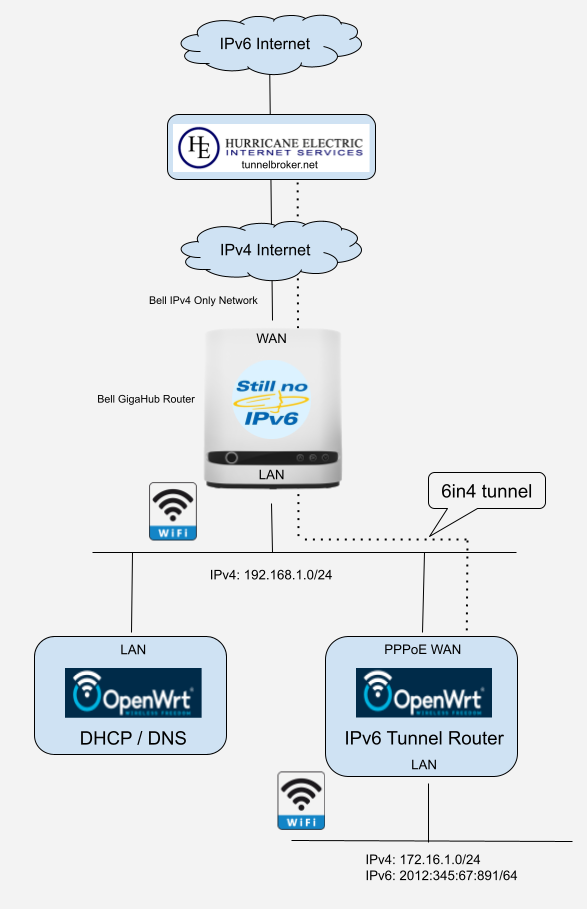
Dedicated DHCP/DNS on primary LAN
All the normal (IPv4 only) network traffic uses the 192.168.1.0/24 LAN that is routed by the Bell GigaHub. There’s nothing unusual about anything on this network other than that I don’t use the DHCP service provided by the GigaHub.
For DHCP, I have (already had) a dedicated DHCP / DNS server running on the network. It is a modest DHCP server (but nonetheless much more capable than that provided by the GigaHub). It’s nothing more than OpenWrt running on an old router and configured to provide only DHCP services. It provides routing information to clients using DHCP options and configures the Bell GigaHub as the default route (just as the GigaHub itself would do if it was acting as the DHCP server). This is optional, but you’ll see later that it is part of the routing solution to access the 172.16.1.0/24 sub-network
Note that this DHCP server only serves clients on the IPv4-only 192.168.1.0/24 local area network. It has no role to play in providing IPv6 support. Clients on this LAN only have IPv4 internet access.
IPv6 support on sub-LAN.
The IPv6 tunnel router has a PPPoE WAN connection with a public IPv4 address that is different than the GigaHub’s WAN IPv4 address. It has a LAN sub-network that I assign IPv4 172.16.1.0/24 to distinguish it from the primary LAN.
This router runs the Hurricane Electric IPv6 tunnel, and it runs its own DHCP and DHCPv6 service for clients of its LAN (which is normal OpenWrt router configuration). LAN clients get an IPv4 172.16.1.0/24 address and an IPv6 address derived from the tunnel’s IPv6 prefix. All clients of the tunnel router’s LAN have IPv4 internet access via the PPPoE link and IPv6 internet access via the 6in4 tunnel.
Routing across the LANs
The weakness of this approach is that the computers on each LAN are totally isolated. By default there are no routes between the 192.168.1.0/24 LAN and the 172.16.1.0/24 LAN.
This can be remedied as follows:
-
Add an additional network interface on the tunnel router’s WAN ethernet device that is configured with a static 192.168.1.0/24 address.
-
Add a route on the tunnel router for 192.168.1.0/24 destinations originating on the 172.16.1.0/24 LAN.
-
Add firewall configuration on the tunnel router to permit traffic to pass between the 192.168.1.0/24 and 172.16.1.0/24 LANs.
-
Add routing on the 192.168.1.0/24 network for 172.16.1.0/24 destinations originating on the 192.168.1.0/24 LAN.
Tunnel router configuration
Here is the tunnel router configuration that accomplish items 1, 2, and 3 above:
# Setup the sub LAN's 172.16.1.0/24 address range.
uci set network.lan.proto='static'
uci set network.lan.ipaddr='172.16.1.1'
uci set network.lan.netmask='255.255.255.0'
uci commit

# Add a new interface called "wlan" on the WAN's ethernet port, and
# configure a 192.168.1.0/24 static address.
uci set network.wlan=interface
uci set network.wlan.proto='static'
uci set network.wlan.device='eth1'
uci set network.wlan.ipaddr='192.168.1.5'
uci set network.wlan.netmask='255.255.255.0'
uci set network.wlan.defaultroute='0'
uci commit

# Add a route to the 192.168.1.0/24 network.
uci add network route
uci set network.@route[-1].interface='wlan'
uci set network.@route[-1].target='192.168.1.0/24'
uci commit

# Update the firewall to pass traffic between the lan (172.16.1.0/24)
# and wlan (192.168.1.0/24) zones.
uci add firewall zone
uci set firewall.@zone[-1].name='wlan'
uci set firewall.@zone[-1].input='ACCEPT'
uci set firewall.@zone[-1].output='ACCEPT'
uci set firewall.@zone[-1].forward='REJECT'
uci set firewall.@zone[-1].network='wlan'

uci add firewall forwarding
uci set firewall.@forwarding[-1].src='lan'
uci set firewall.@forwarding[-1].dest='wlan'

uci add firewall forwarding
uci set firewall.@forwarding[-1].src='wlan'
uci set firewall.@forwarding[-1].dest='lan'
uci commit

# Restart the network to activate the new configuration.
/etc/init.d/network restart
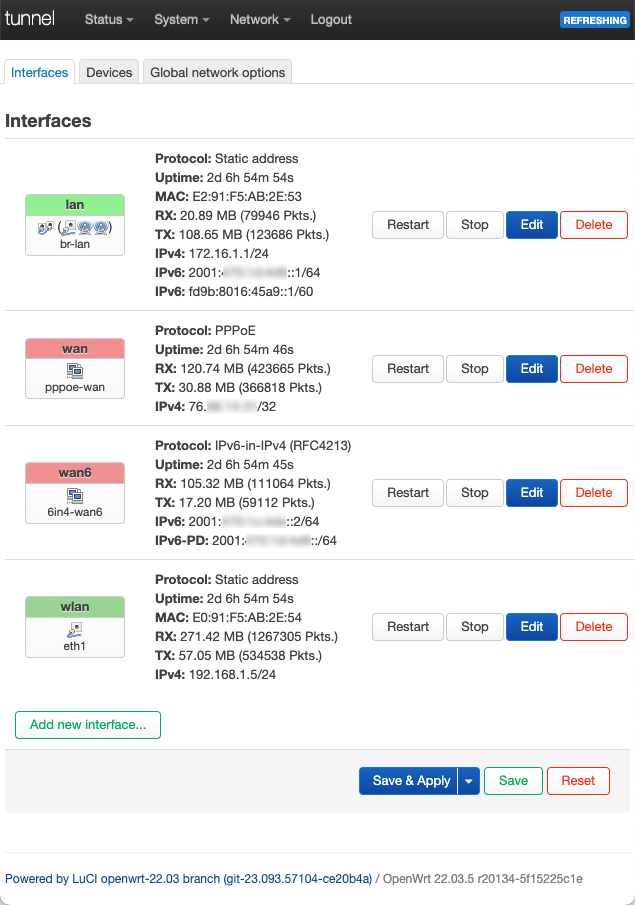
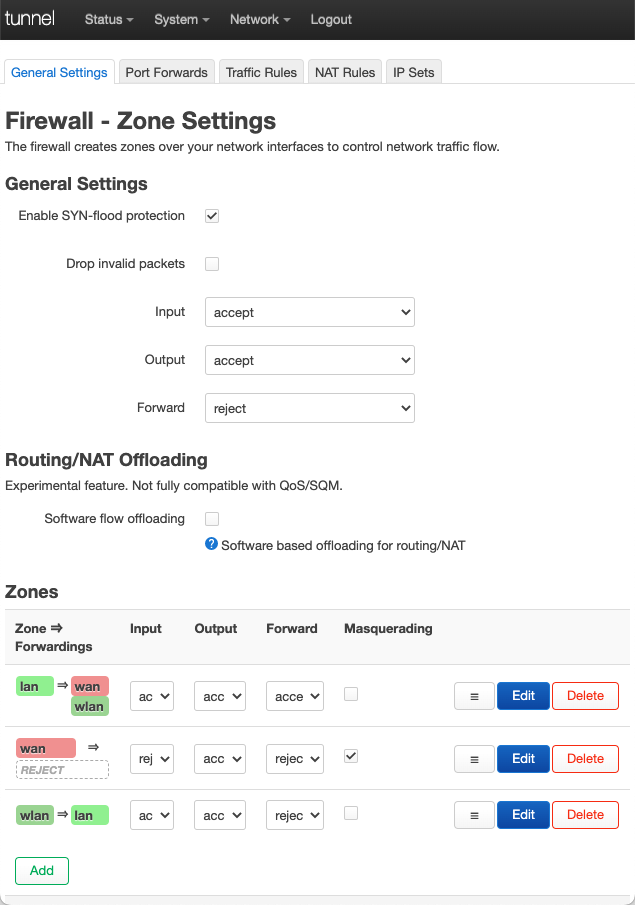
When that’s done, the network interface and firewall configuration appear as follows in LuCI:
Primary LAN routing
The final detail is to add routing for 172.16.1.0/24 traffic originating on the 192.168.1.0/24 LAN.
The GigaHub is the default router on my primary LAN, but unfortunately it has no ability to add additional routes. That leaves configuring routes on each individual computer on the network as the best alternative. Fortunately that’s easy to accomplish with the OpenWrt DHCP server that I use on my primary LAN. DHCP configuration option 121 Can be used to add a static route.
The DHCP option 121 routing configuration entry looks like this:
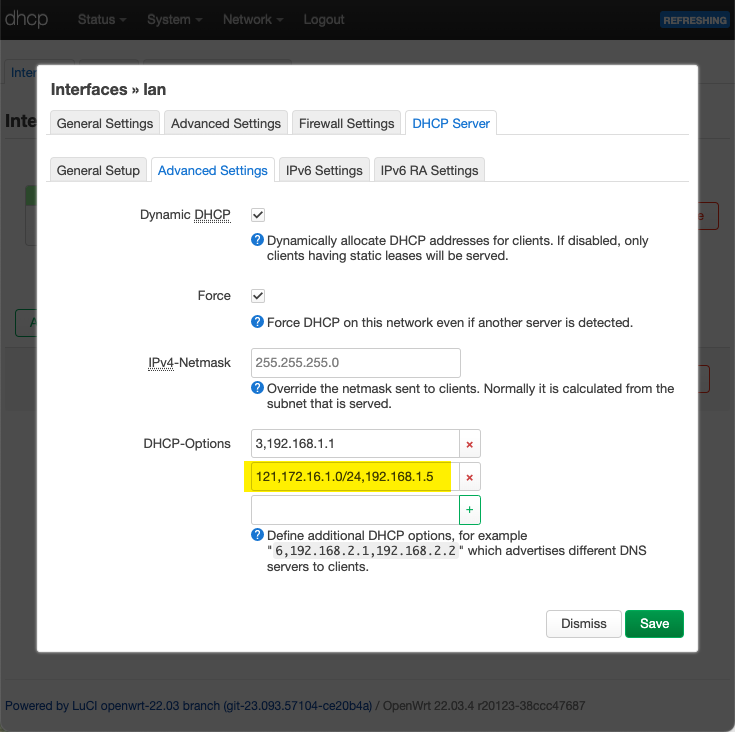
See addendum 2 for an important note about DHCP option 121.
Here is what the final DHCP config looks like on a Mac on the LAN:
$ ipconfig getpacket en0
.
.
yiaddr = 192.168.1.21
.
.
classless_static_route (classless_route): {172.16.1.0/24, 192.168.1.5} #OPT 121
router (ip_mult): {192.168.1.1}
end (none):
And here’s the active route that was configured automatically via DHCP option 121:
$ netstat -rn | grep 172
172.16.1/24        192.168.1.5        UGSc              en0
Addendum
-
The Google Draw topology diagram is free to use if anyone finds it useful.
-
The picture above with the option 121 (static route) highlighted also shows use of dhcp option 3 (default gateway). The two are actually not compatible. If the dhcp server sends option 121 then the dhcp client will ignore option 3, and your client will not have a default gateway configured (if it is a strict implementation of RFC3442). You have to use option 121 to send both routes. The following configuration does that:
121,0.0.0.0/0,192.168.1.1,172.16.1.0/24,192.168.1.5